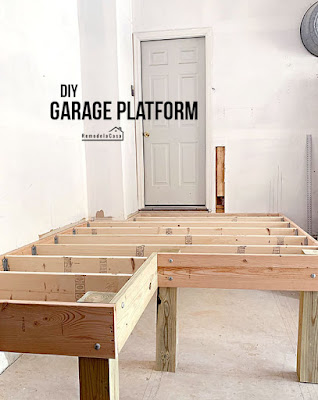
The mudroom project is coming along nicely. Last week I left you with that picture you see below after showing you the plan I had for this corner of the garage... Our mudroom. :)
You can check that post right HERE.
Today's post is all about building the platform to gain access to the house. Very similar to what we had before, only that this time it's a bit bigger and higher.
Let's continue right where we left off...
-We were using the old steps to get in and out of the house, but that top step was a serious hazard! 😬
*This post contains affiliate links for your convenience. Click here to read my full disclosure policy.
The first task was to install the 2 x 10's ledgers alongside the walls.
-Check my previous post to determine how high or low to install those ledgers.
Ensure they are level and that you're driving the screws or nails onto the studs on the wall.
NOTE: At this point, we used our DeWalt framing nailer to speed things up. using 3 1/2" nails. However, two 1/2" lag bolts were driven into each stud later on, to better support the intense load.
Then, we connected the other 2 x 10s all around, using clamps to secure them temporarily to vertical 2 x 4's. Checking and double-checking that everything was level.
Once happy with the layout, it was time to install the posts.
Let's do a little parenthesis here to talk about the materials I used. >>> Compared to the structure we previously had in here, these new posts and joists seem bulkier, stronger. The previous platform was done with 2 x 6 joists and the supports were made out of 2 x 4's.
This time around I'm using 2 x 10 joists and 6 x 6 posts. Both platforms are OK. The old platform was only used to get in and out of the house, while the new one will support walls, window-s, a door, strong flooring and cabinets with lots of storage capacity. That's why we made it stronger.
Another reason to use the 6 x 6 posts is that I didn't want too many obstructions underneath the decking area because the plan is to use that area as storage. ;)

Two carriage bolts on each post, with their corresponding washer and nut. And I can't stop emphasizing the importance of using the right tool for the job! In this case, this Milwaukee Impact wrench was the perfect tool to easily secure those posts.
Looking good!!
Here, Stan was having fun with the Impact wrench, driving the lag screws onto the wall.
INSTALLING THE JOISTS
The next step was to install the joists. They were installed every 16" on center. We used Simpson Strong-Tie 2 x 8 joist hangers.
INSTALLING THE SUBFLOOR
| OSB |
Liquid Nails were added to the top of the joists before bringing the OSB in place.
Mark the center location of each joists on the outside of the ledgers and on the wall. Those marks are going to be helpful in drawing guiding lines for driving the screws to secure the OSB to the joists.
Here you can see how the platform looked at the end of the day. The old staircase was brought in one more time to help us get up there.
And here is my happy face with the progress! :D
The next step is the framing of this little room, and that's going to be my next post. But I want to leave you with these two pictures below.
A few weeks ago I went looking for windows at The Community Forklift here in Maryland. They have tons of used, reused, and vintage construction materials. Without having a set plan in mind for this little room, I bought two of those huge Jeld Wen windows for a fraction of their real cost.
Two windows!
What do you think? Well, that's going to be cleared up during my next post.
Stay tuned!
-------------------- . * . * . * . * . * . -------------------
Here are all the projects that were tackled during this mudroom build:
*This post contains affiliate links.


I would recommend only using 1. The reason you have put all this work into this space so you can utilize it as a mud room. If you have two large windows that kind of defeats the purpose :)
ReplyDeleteDefinetely! Yes, I only installed one. Wall space/storage is a necessity on both sides.
Delete