Adding board and batten on a single wall is a very easy project that will add lots of character to a boring room.
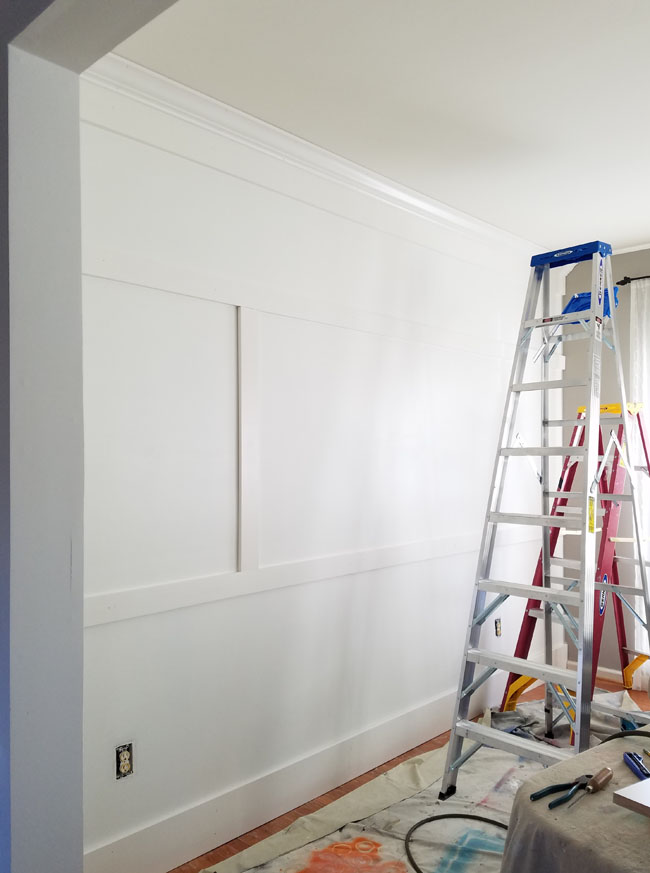
I recently completed work in our dining room, which is the room contiguous to this, our living space. Christmas was just two days away which meant I had to clean and make this room presentable for the holiday. Well, I went the extra mile installing a simple wooden grid or board and batten. It went quickly, in only two days this area got completely transformed!
 |
| Telephone Wall Sign |
This is the reason I wanted to install the board and batten here. This is such a big wall, whatever I hung in there was lost. Well, the only thing that fitted nicely was the old window gallery, you can see it HERE. But, after having it for more than two years, it was time to let it go.
The cost of the wood for this wall alone was under $200. And let me tell you, I didn't go for the cheapest materials. I got primed finger-joint pine material. That's what I almost always use for trim around the house. I didn't want to deal with MDF. I don't have a table saw, ripping it would've been a pain. Same thing for sanding and priming all that material.
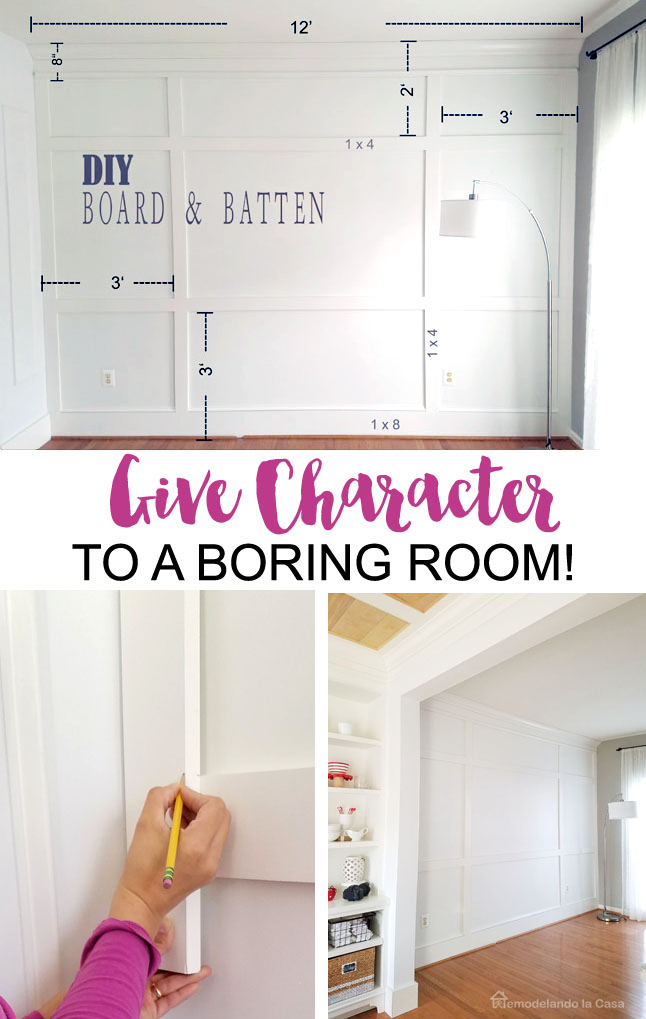
For this 12' x 9' wall this is the wood I used:
Other materials and tools:
I had removed the tiny baseboards long ago, so I went directly to patching holes, cleaning the drywall, and giving the wall two coats of Behr - Swiss Coffee - Satin finish.
The next step is very important: Find the studs on the wall and mark their location.
The 1 x 8 baseboard was the one I installed first, driving the nails to where the studs were located.
Then, using the Ryobi compact laser level, I marked the location for the horizontal 1 x 4 & 1 x 6 boards, again, securing them to the studs on the wall.
Mark the location and check the level line for the vertical pieces. Placing the board on the wall and doing a simple pencil mark was all the measuring I needed.
Many of these pieces weren't secured to the studs, I didn't even apply liquid nails on those. If I get tired of this wall treatment, later on, it will be easy to remove. ;) Three nails to the drywall kept them in place.
The top part was done with a 1 x 6, the crown molding at the top, and the wall cap sitting on the lower part of the 1 x 6.
And hey, no, I'm not a lefty, I was holding the nailer with my left hand while I took the pic to show you how to hold that long piece of trim when there's no one helping you. As usual, Gaffers Tape does the trick for me. ;)
I've been happy to put this, the Ryobi 18-Volt 15-Gauge AirStrike Cordless Angled Nailer to good use. Perfect for installing crown molding, no need to have a compressor by the side, and the ability to drive 2.5" 15-gauge nails all the way thru.
On another note, please PLEASE, don't install the boards leaving an overhang on the baseboard. If you don't want to remove the baseboards, my blogging friend Alicia found a great way to solve that problem right HERE.
The next task is to go and patch all those nail holes. I didn't have the usual brand I use, but I heard that this wall spackling paste works well, so, that's what I used. I filled those holes twice, waiting for the paste to dry in between coats and then, a light sanding.
Acrylic Latex Caulk was used to fill those long gaps alongside the ceiling, wall, and in between boards. It makes a huge difference!
The baseboard was topped off with the wall cap molding.
I always like it when I find measurements on a project, it makes me visualize my project much better. These are the measurements for this wall. Oops, I see I didn't add the total height, :/ 9 feet.
This room is not finished yet, I still need to install the crown all around, frame that big door in between the two rooms, trim the windows, and paint the other walls. Oh, and that shoe molding isn't attached either.
But hey, I love how it looks with this featured wall! Look at that tiny baseboard on that window/wall. :D That's gonna be my enemy next week. :/

Here is the look from the other side of the room, with the dining room/office peeking there on the left.
Here's a recent picture of this room:
Here are some more DIY Home Decor ideas you might want to check:
The cost of the wood for this wall alone was under $200. And let me tell you, I didn't go for the cheapest materials. I got primed finger-joint pine material. That's what I almost always use for trim around the house. I didn't want to deal with MDF. I don't have a table saw, ripping it would've been a pain. Same thing for sanding and priming all that material.
For this 12' x 9' wall this is the wood I used:
- 1 x 4 - 56 feet
- 1 x 8 - 12 feet
- 1 x 6 - 12 feet
- Crown Molding - 12.5 feet ( 9/16 x 4-5/8)
- Wall Cap - 24 feet
*This post contains affiliate links for your convenience. Click here to read my full disclosure policy.
Note: I gave all the material a light sanding, cleaning, and two coats of Behr Swiss Coffee - Semi-Gloss finish before cutting it. It went fast using one of those Purdy mini rollers and covers.
Other materials and tools:
- Paint and painting materials.
- Level - I used a compact laser level, but keep a regular level handy.
- Pneumatic Nailer (you can use a hammer and regular nails, but it will take longer).
- 2½" brad nails for crown and the 1x material - 1¼" brad nails for wall cap.
- Tape Measure
- Miter Saw
- 120 grid Sandpaper
- Caulking
 |
| | RYOBI Compact Laser Level | |
I had removed the tiny baseboards long ago, so I went directly to patching holes, cleaning the drywall, and giving the wall two coats of Behr - Swiss Coffee - Satin finish.
The next step is very important: Find the studs on the wall and mark their location.
The 1 x 8 baseboard was the one I installed first, driving the nails to where the studs were located.
Then, using the Ryobi compact laser level, I marked the location for the horizontal 1 x 4 & 1 x 6 boards, again, securing them to the studs on the wall.
Mark the location and check the level line for the vertical pieces. Placing the board on the wall and doing a simple pencil mark was all the measuring I needed.
Many of these pieces weren't secured to the studs, I didn't even apply liquid nails on those. If I get tired of this wall treatment, later on, it will be easy to remove. ;) Three nails to the drywall kept them in place.
The top part was done with a 1 x 6, the crown molding at the top, and the wall cap sitting on the lower part of the 1 x 6.
And hey, no, I'm not a lefty, I was holding the nailer with my left hand while I took the pic to show you how to hold that long piece of trim when there's no one helping you. As usual, Gaffers Tape does the trick for me. ;)
I've been happy to put this, the Ryobi 18-Volt 15-Gauge AirStrike Cordless Angled Nailer to good use. Perfect for installing crown molding, no need to have a compressor by the side, and the ability to drive 2.5" 15-gauge nails all the way thru.
On another note, please PLEASE, don't install the boards leaving an overhang on the baseboard. If you don't want to remove the baseboards, my blogging friend Alicia found a great way to solve that problem right HERE.
The next task is to go and patch all those nail holes. I didn't have the usual brand I use, but I heard that this wall spackling paste works well, so, that's what I used. I filled those holes twice, waiting for the paste to dry in between coats and then, a light sanding.
Acrylic Latex Caulk was used to fill those long gaps alongside the ceiling, wall, and in between boards. It makes a huge difference!
The baseboard was topped off with the wall cap molding.
This room is not finished yet, I still need to install the crown all around, frame that big door in between the two rooms, trim the windows, and paint the other walls. Oh, and that shoe molding isn't attached either.

Here's a recent picture of this room:
 |
| | Fall Living Room Decor | |
Here are some more DIY Home Decor ideas you might want to check:
*Ryobi Tools were given to me to try out,
I love them so much that they are the tools I use for my everyday projects.
All stated opinions are my own.*
Affiliate links were added for your convenience.


Awesome as usual!!
ReplyDeleteAww You're making my evening, Ann, Thanks!
DeleteGreat tutorial and this wall is gorgeous.
ReplyDeleteThanks Marty!
DeleteLooks amazing Cristina. You are so talented. Now I am on the hunt for a small laser level. That looks like one fantastic tool to have!!
ReplyDeleteOh, hi Karen! I'm loving this compact level. I keep on using it all the time, especially for hanging pictures.
DeleteYou absolutely amaze me! Have you always been this handy?
ReplyDeleteBrenda
wow, Brenda, so glad to hear that! I'm one of those that cant' keep their hands still, I need to do something while watching t.v. or while waiting for something to happen. So, if that's handy, then yep, I've been always like this. Though, the woodworking thing its been with me for the past 6 years, one step at a time and learning a new thing or two with each project.
DeleteYou are my inspiration! Are your walls textured? Our walls are textured would you put trim on them?
ReplyDeleteThanks so much, Cynthia! You ladies really are making my evening. :) No, our walls aren't textured. If there is a light texture I'll do it. It's going to need more caulking all around, but I think is doable. If it's a heavy textured wall it's better to install ¼"-plywood or thin underlayment before installing the trim. This last option would be a much better way of doing it.
DeleteYou have inspired me to do my kitchen soffits. Plan to start the first week of February. This past year I did my son's room after seeing your son's wonderful and beautiful room. I wish I could send you photos! I wish I had your talent though.
DeleteOnce again thank you for sharing! Cynthia Schuster - Parker, CO
Cynthia, I would love to see your projects! You can e-mail me pictures at: remodelandolacasa (at) gmail (dot)com. I might share them on the blog with your permission. Kitchens are always a fun project. Well, hard and messy work too, since they're the space we use the most, but all the hard work you're gonna invest on it, will be celebrated later on! I Can't wait to see the progress in your kitchen, and hey, let me see your son's room. Maybe you need your own blog! :)
DeleteLooks fabulous, as always! I'm going to do something similar on the bottom half of our dining room.
ReplyDeleteOh, I love your dining room, Julie. I still remember that pocket door you have there. It's going to look even better when you tackle this project. Thanks for stopping by and for your sweet comment!
DeleteCristina I love seeing your projects. You do beautiful work! The board and batten adds so much to your living room wall! This is actually the first thing I'm going to do this year and can't wait to get started.
ReplyDeleteIt turned out beautiful! I am trying to figure out what I want to do in our dining room.
ReplyDeleteLove it. I have a feature wall that has a awesome fireplace but two scounces I loathe. I don't want shelving as the room is too small and hadn't thought of a solution. This is the perfect addition to the room. Pinning to show hubs. Thanks bunches.
ReplyDeleteAmazing! So beautiful and lovely! I love all the things you have done and applaud your DYI!!
ReplyDeleteNancy
wildoakdesigns.blogspot.com
Wow! That wall is so impressive now! Seriously beautiful! We did a small B&B wall in the hall bathroom and I love the way it looks!
ReplyDeleteJust put board and batten up in my entry! Trying to add a little character one little project at a time. But you know me...not a tutorial person. So I will link back to this tutorial when I finally share. Beautiful!!!!
ReplyDeleteI need to go check it out! Thanks for linking back, Beck! 😘
DeleteCaulking will shrink over time and show the gaps between the boards. Plastic wood filler is the best for keeping this from happening.
ReplyDeleteThanks for the input!
Delete