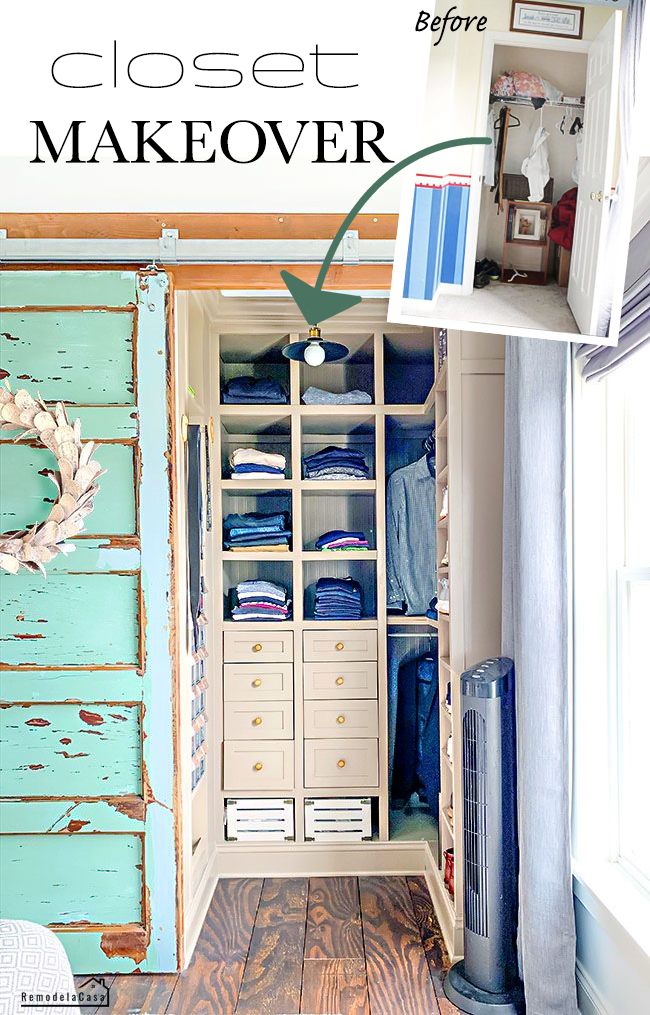
The makeover of my son's bedroom started with a closet transformation. A closet in desperate need of storage solutions.
Guess what?
This closet makeover is DONE!
And I'm so delighted with how it turned out.
It looks way more spacious, and now my son has a place to put most of his stuff. But hey, let's dive into all the details about this makeover!
*This post contains affiliate links for your convenience. Click here to read my full disclosure policy.
It all began when I removed the door and the surrounding wall. The space immediately looked wide open.
The shelves on the back wall were built and installed. The wall got a beadboard wallpaper treatment.
I also installed the drawer slides on the lower part of those carcasses.
As you can see, I also painted the unit. My vision was for a white closet, but my client didn't approve. We both picked this caramel color, and I really liked it.
A shelf was built and installed between the studs. To better utilize this space, I installed flip-out bins, not before giving them a makeover since they were plain white.
| Flip-Out Bins | Gear Decor |
I built another shelf there, but it was much smaller than the others already installed. This new shelf would be for shoe storage.
A 2 x 6 base was made, just the same as the one before.
The top part was attached to the other shelves using pocket holes and a cleat on the wall for more support.
I added lattice on the outside to give interest and to cover the seam at the top.
I don't like building drawers, but I gave them my best, measuring twice and cutting once. ;)
Even though I took plenty of precautions, I still had to go through some adjusting to those drawers.
There was the one that was cut too short. Then, the others were somehow out of level. And let me tell you... Way out of level!
It all got fixed before going to work on building the drawer fronts.
Surprisingly, the fronts were easy to position. The final touches were installing the crown molding, caulking all the nooks and crannies, sanding, and repainting the whole thing.
This is how it looks now.
I love these bins; they fit nicely on this wall shelf.
A decorative wooden spool was repurposed as a hook. It holds my son's flashlight, but he can hang a sweater or anything else.
The troublemaker drawers are one of the features I love the most about this closet. They don't look too bad for being the first time building and installing drawers.
Perhaps the thing I love the most about the drawers is the knobs, the wood, and the rusty gold. They were a thrifty find. I bought like 40 of these knobs for five bucks!
CHECK HOW THE REMAINING KNOBS WERE REPURPOSED HERE & HERE.
Two small wooden baskets offer more storage possibilities.
The corner area was divided ---> Double closet rods. The shelf between the rods can be removed if we change our minds later.
Finally, there is the shoe tower and all the storage space at the top. Now that there's a place to store shoes, I wish I could stop seeing them all around the house.
Remember, this is the first part of my son's room makeover. I still have a long way to go. I used an area rug to better style the closet. A new floor treatment for the whole room is coming. The baseboard is not nailed in place yet.
My next project in this room is making and installing a sliding closet door. Stay tuned! Here, of course, is the before and after.
The following are all the links to each of the projects done in this room:
Surprisingly, the fronts were easy to position. The final touches were installing the crown molding, caulking all the nooks and crannies, sanding, and repainting the whole thing.
This is how it looks now.
CHECK HOW THE REMAINING KNOBS WERE REPURPOSED HERE & HERE.
Remember, this is the first part of my son's room makeover. I still have a long way to go. I used an area rug to better style the closet. A new floor treatment for the whole room is coming. The baseboard is not nailed in place yet.
Check how this closet looked after installing the sliding barn door and floors. I just love it!!
The following are all the links to each of the projects done in this room:


Hi there .. just found your site... so inspiring! So impressed with your work! Love this closet make over .. one question .. how did you join the shelves that are atop the right side shelving unit to the shelves on the back unit? (the corner shelves ... how did you join them? Thanks so much!
ReplyDeleteHi, those shelves were put together with glue and Kreg Jig screws from one board to the other, but also with the same screws driven from the boards, to where I could find studs on the wall.
DeleteHi! what is the name of that paint? I love it! I am just remodeling my closet!
ReplyDeleteThanks! I used Behr Ultra - Ottertail - Semi Gloss finish. Good luck with your project!
DeleteWow this is a beautiful transformation! I love the drawers, the color and the addition of the wooden spool all of the details are gorgeous
ReplyDeleteThanks so much Julie! The drawers are the ones my son uses the most in this closet. It looks like all the trouble paid off. Thanks for stopping by.
Delete