Hey there!
I've been MIA these past days, lots of stuff going on in my family, first of all, it's Summer and as usual our schedule is all wacky!
This past week my daughter turned 18. Hard to believe! Just yesterday she was a baby. Time flies.
:'(
By the way, she has her driver learner's permit, took driving lessons, and is right now completing her driving hours.
Ha, I think they're all done! I'm usually the responsible adult who sits by her side while she drives, and you know what? She wants to go everywhere all day long!
In addition, Mr. RLC had knee surgery ... So, one more that cannot go places without me!
In the spare time I have between driving and driving I've been working on my son's room. ;)
My last post was about inspiration I gathered on-line to create a build-in wall around his bed, but alas, I decided to begin working on the closet instead.
This next picture shows you how my son kept his closet. Most of the time the door was closed, he didn't use it.
It's a very small closet 48" x 24", you can see the layout of his bedroom in the picture below.
One of the things I hate about this closet, besides the lonely wire shelving, is the swing door.
So, my plan was to get rid of the door and the small surrounding wall around it. And replaced those two with a sliding door as seen in the after of the room's layout.
Warning: Before attempting to remove any wall you have to make sure it's not a load bearing wall.
By doing so, I'll gain a bit of extra space in the closet and out in the room, with no wasted space for a door.
With my plan all set, I began my work by removing the trim on the door.
Then, the drywall. Remember to use a utility knife to score and separate the areas you want to remove from the areas you want to keep. In my case the corners and ceiling line.
Once the Sheetrock was removed I was left with the frame and door. You can remove the door easily using a reciprocating saw with a metal blade, scoring in between the door frame and the 2 x 4s to where the door is attached, cutting the nails. It's kind of unbelievable but I don't have a reciprocating saw, I had to use my oscillating tool, it worked just fine. ;)
The wall frame looked so sturdy but surprisingly it was kind of easy to remove.
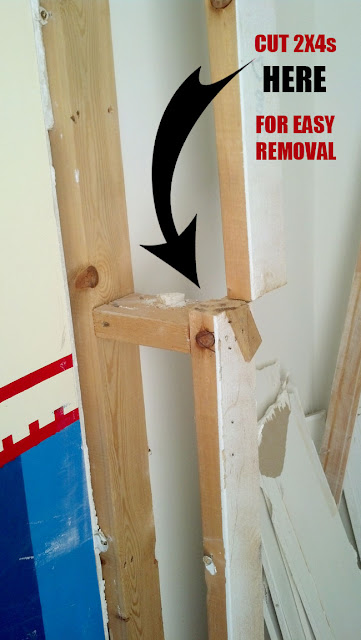
The trick was to cut the 2x4s mid way and pull off the pieces, wiggling them, until they came out.
The remaining 2x4s attached to the walls were also cut in half before pulling them away. The one on the ceiling was pull out with the "gentle persuasion" of a pray bar.
Now I have some gaps that need to be patched.
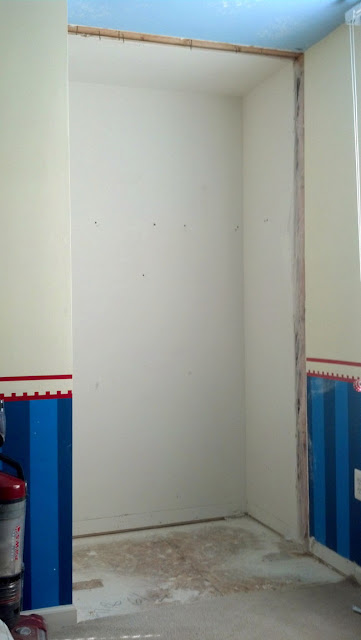
I went ahead and removed the baseboard and the carpet. It looks so open now!
The before and after.
And hey, stay tuned for my next post where I'm gonna show you my plans for the inside and a bit of the work already done.
(Hugs)
The following are all the links to each of the projects done in this room:


What a difference it will be, there was so much wasted space!
ReplyDeleteIt makes a huge difference, Julie! Not only the door, but the space hidden by the wall above the door is another area that most of the time gets unused.
DeleteWow! Love the extra space!
ReplyDeleteAh yes ... they grow up way too fast! Hope Mr. RLC is healing quickly & well!
Hi Guerrina! Yep, it makes me feel old! :D
DeleteWhat a huge difference! Can't wait to see what it'll look like! Hope Mr. RLC gets well soon!
ReplyDeleteThanks Vel! The mister is feeling much better, my guess is that in about a week he'll be his old self! ;)
DeleteI wish I could take down every closet door and surrounding. I think it makes rooms feel smaller and makes it hard to store things on top. Like the open feel
ReplyDeleteThat's exactly what I want to accomplish here, Daniela! So far so good. ;)
DeleteYeah! i love taking down walls. It always makes so much difference!!
ReplyDeleteYou're killing me with how handy you are! I can't wait to see it!
ReplyDeleteHow will you deal with the nails in the ceiling area? Recep saw? I am about to start this on a coat closet turned "drop zone". Such perfect timing! I've google searched this until I was blue in the face! Youve done such an amazing job and your tutorials are easy to follow and don't intimidate me. Can't wait to see the next step.
ReplyDeleteThanks Ann! Yep, I was, precisely, taking care of those nails today! :) I don't have a reciprocating saw so, I used my oscillating tool with a metal blade to cut them, it was like cutting thru butter. I haven't been able to post the next steps, later this week I'm going to do it, it's now taking shape and I'm loving it. Thanks for stopping by!
DeleteCristina, you never cease to amaze me. I have no clue what a reciprocating saw is, and that is perhaps on of the reasons I am not demolishing any closets in my home right now. LOL!! I can't wait to see the finished product as all of your designs are simply amazing!
ReplyDeleteHugs,
Betty