Yep, another plate rack ;)
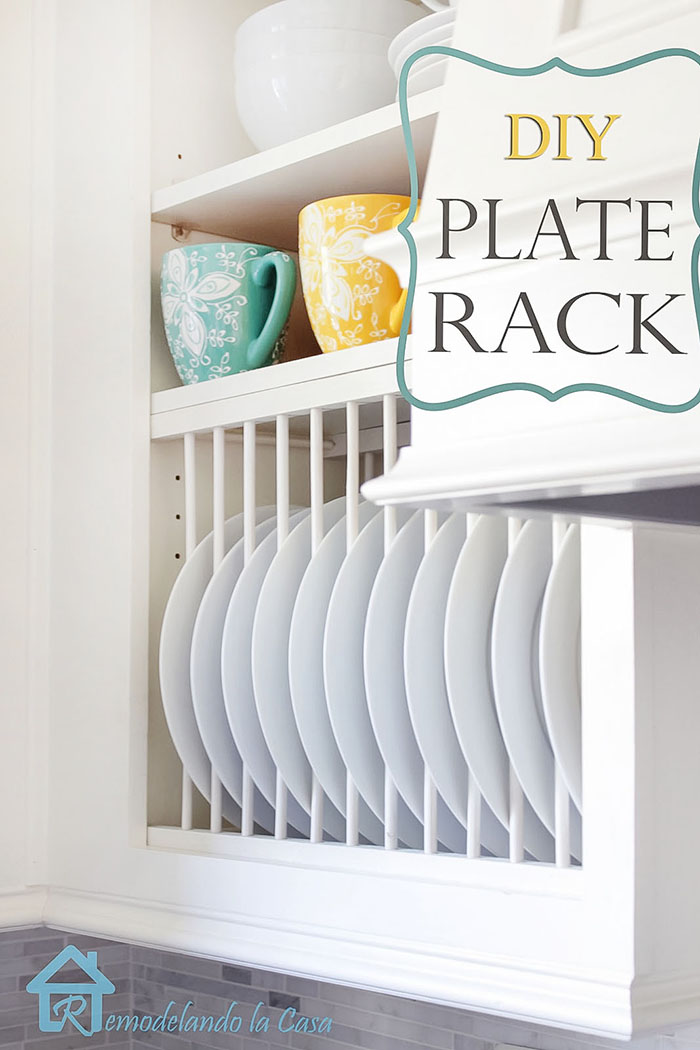
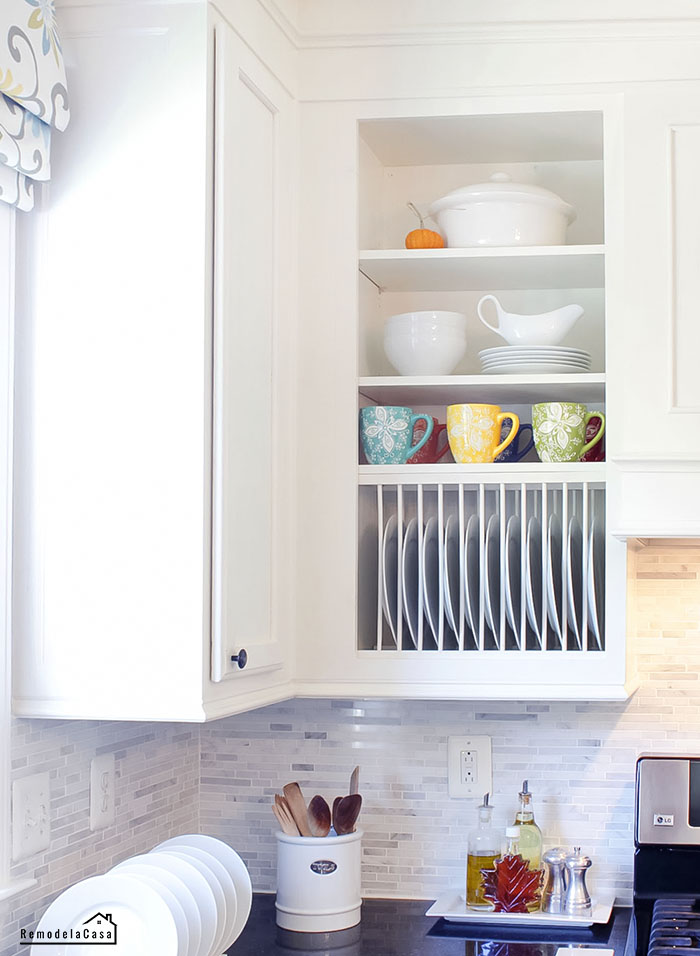
The small plate display rack was placed inside the cabinet to see how it would look in there. Nope, not that good. But, hey! The idea of a built-in plate rack was born, followed by a quick assessment of what was stored in the cabinet, because the door had to go.
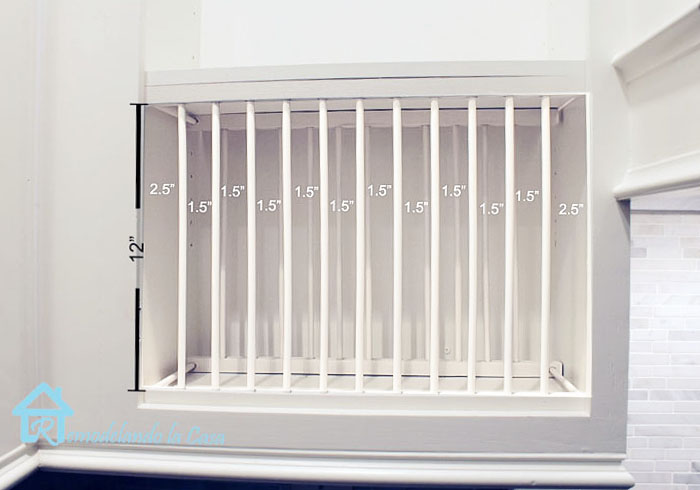
Since the cabinet I was dealing with has a face frame, the slots on both ends had to be bigger, to accommodate that "dead space".
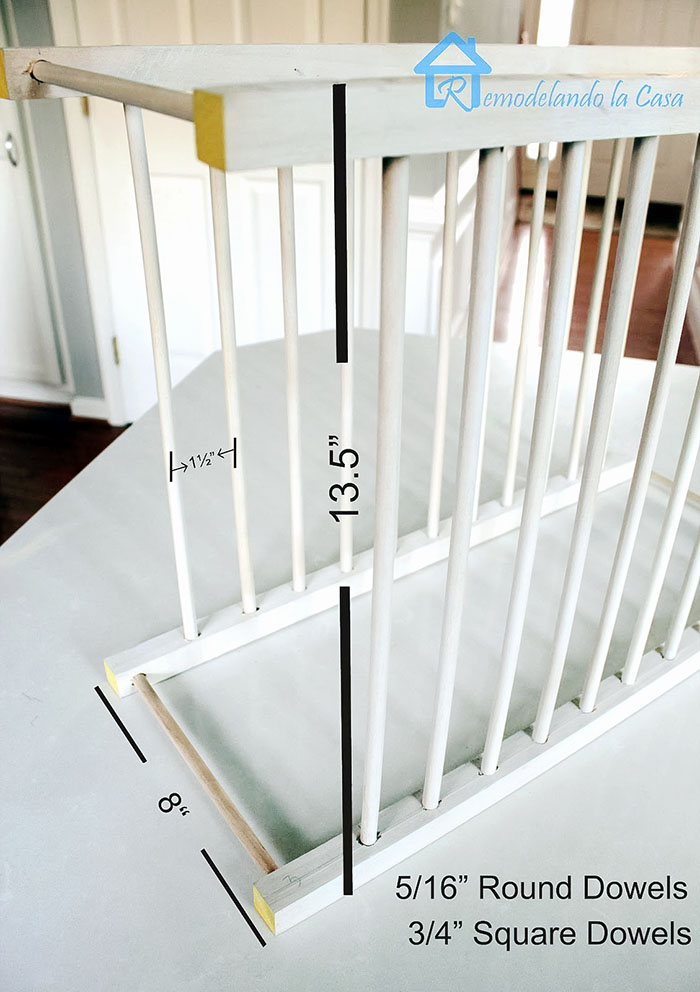
The round dowels were cut at 13.5" -> 12" for plate space + the 1.5" space that they had to go into the square dowels.
*Easy trick to cut those round dowels: I didn't want to cut one by one, all the 22 pieces I needed. If I cut just one with the miter saw, it's going to get damaged... too much power. Doing the cuts with a hand saw...too much trouble! So, they got bundled (four at the same time), using the miter saw and holding them tightly with gaffer's tape (One of my all-time favorite tapes). The end result...perfect cuts ;)
On your square dowels mark the places where the round dowels would go. Trace a lengthwise center line on each dowel. Each intersection will be the place to drill the holes.
Using an awl and hammer, mark each spot before drilling the holes.
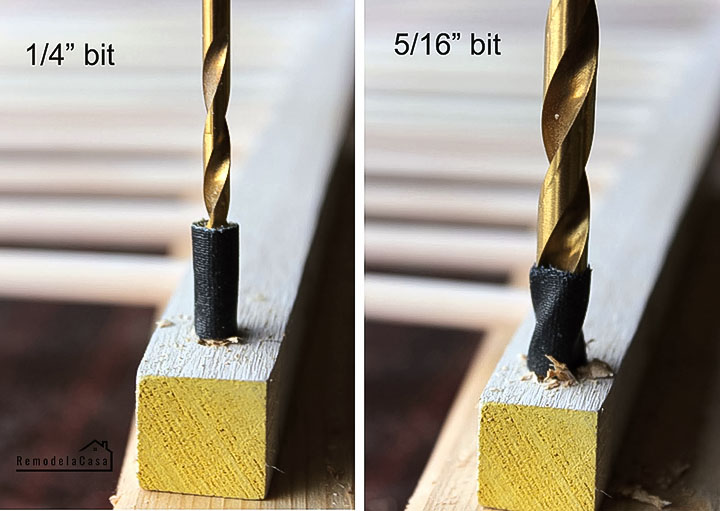
I used a ¼" drill bit to make pre-drills, then I used a 5/16" drill bit for the size of the round dowel.
*I tried to cut time by bundling two square dowels to drill all those holes, but it didn't work. The hole in the top dowel was OK but the drill bit came out the lower dowel way off-centered. I went one dowel at a time...44 holes total.
Once all the round dowels are cut and the holes drilled in the square dowels, you can go ahead and do a dry fit. Don't skip the dry fit, sometimes the dowel doesn't fit in the hole >:( even though they are the same size! Just drive the drill bit one more time.
When you're happy with how everything fits, go ahead and glue it in place. It needs a very small amount of glue on each end of the round dowels.
Wait some time for the glue to dry, then using the same drill bits for pre-drill and actual dowel size, score four holes on each corner of each rack part.
DO NOT GLUE those small connecting dowels, otherwise, you're not going to be able to fit the whole structure inside the cabinet.
You can now sand, prime, and paint the whole plate rack the way you want it.
Because of the face frame on the cabinet, you have to install the plate rack in parts (I learned that the hard way when I got into a similar situation with the bookcases in my bedroom).
3. Bring in the other part of the rack and assemble the whole structure - getting the connecting dowels in place.
Trace the square dowels' location on the bottom of the cabinet. Mark the location where to screw it in place (preferably in the middle of two round dowels.
5. Place one of the shelves you already had in the cabinet on top of the plate rack.
After cleaning, all that is left to do is to bring your dishes, see how they fit and admire your job ;)
Well, I'm still thinking of adding a piece of wood to the face frame to hide the gap in between the plate rack and the shelf that was attached to it. hmmm, now I can clearly see when one of my plates is missing :/ I remember I had 12, but somehow only 11 appeared.
I like how taking the door off and displaying the dishes and some cups, gives more openness to the kitchen.
*This post contains affiliate links for your convenience. Click here to read my full disclosure policy.
The plate display rack dimensions right here were a great guide for me to complete this new project.
*It is important to have in mind that I was working with a 20" width cabinet, and the necessary space for my plates to have a snugly fit was 1.5"
First, measure the cabinet where you are planning to install the plate rack. Also, measure your plates, the diameter, and profile (side view).
*In my case, my plates had a diameter of 11" and their profile size was ¾". That's why I decided to space the round dowels at 1.5" on center. and leave the height for plate space at 12".
The plate display rack dimensions right here were a great guide for me to complete this new project.
MATERIALS & TOOLS:
*It is important to have in mind that I was working with a 20" width cabinet, and the necessary space for my plates to have a snugly fit was 1.5"
- 4- ¾" x 36" Square Dowels
- 8- 5/16" x 48" Round Dowels
- ¼" & 5/16" Drill bits
- Wood glue
- Tape Measure
- Angle Square
- Drill
- Miter Saw (A hand saw can be used instead)
- Sander
- Gaffers tape
- Hammer and awl
- 8- 1" Screws
- Pencil
- Spray primer and paint
INSTRUCTIONS
First, measure the cabinet where you are planning to install the plate rack. Also, measure your plates, the diameter, and profile (side view).
*In my case, my plates had a diameter of 11" and their profile size was ¾". That's why I decided to space the round dowels at 1.5" on center. and leave the height for plate space at 12".
Once you know your numbers, it is time to cut the material.
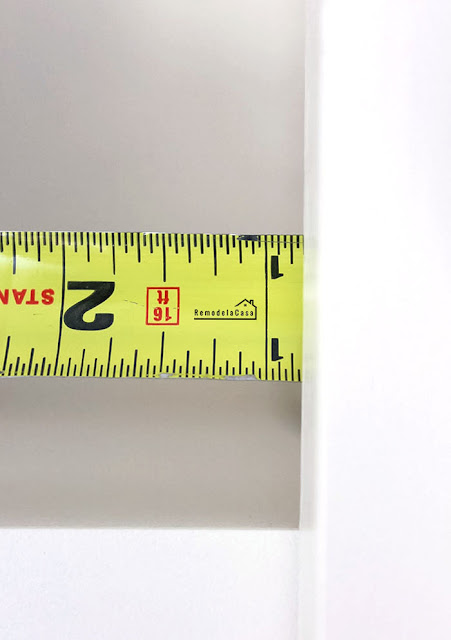
The square dowels were cut 3/16" smaller than the 20" width of the cabinet to have a small wiggle room.The round dowels were cut at 13.5" -> 12" for plate space + the 1.5" space that they had to go into the square dowels.
*Easy trick to cut those round dowels: I didn't want to cut one by one, all the 22 pieces I needed. If I cut just one with the miter saw, it's going to get damaged... too much power. Doing the cuts with a hand saw...too much trouble! So, they got bundled (four at the same time), using the miter saw and holding them tightly with gaffer's tape (One of my all-time favorite tapes). The end result...perfect cuts ;)
Using an awl and hammer, mark each spot before drilling the holes.
I used a ¼" drill bit to make pre-drills, then I used a 5/16" drill bit for the size of the round dowel.
*I tried to cut time by bundling two square dowels to drill all those holes, but it didn't work. The hole in the top dowel was OK but the drill bit came out the lower dowel way off-centered. I went one dowel at a time...44 holes total.
Once all the round dowels are cut and the holes drilled in the square dowels, you can go ahead and do a dry fit. Don't skip the dry fit, sometimes the dowel doesn't fit in the hole >:( even though they are the same size! Just drive the drill bit one more time.
When you're happy with how everything fits, go ahead and glue it in place. It needs a very small amount of glue on each end of the round dowels.
Do it only halfway through, as seen in the picture below, using tape around the bit, creating a hole that's only ½" deep.
DO NOT GLUE those small connecting dowels, otherwise, you're not going to be able to fit the whole structure inside the cabinet.
You can now sand, prime, and paint the whole plate rack the way you want it.
INSTALL THE PLATE RACK INSIDE THE CABINET
1. Place one of the rack sides against the back of the cabinet.
2. Bring in the connecting dowels. Set them in place.
I didn't glue the connecting dowels, they were mainly used as a support to hold the whole structure in place.
4. Align the rack to the front of the cabinet, right behind the face frame.
Trace the square dowels' location on the bottom of the cabinet. Mark the location where to screw it in place (preferably in the middle of two round dowels.
Take the entire structure out to drill the holes in the lower part of the cabinet.
Do pre-drills. Then, bring the structure back in and screw it in place from the bottom of the cabinet up.
5. Place one of the shelves you already had in the cabinet on top of the plate rack.
Mark the spots where you want to drive the screws to secure them to the top part of the rack.
Use a countersink bit to do the pre-drills. Drive the screws from the top shelf down onto the rack.
After cleaning, all that is left to do is to bring your dishes, see how they fit and admire your job ;)
Well, I'm still thinking of adding a piece of wood to the face frame to hide the gap in between the plate rack and the shelf that was attached to it. hmmm, now I can clearly see when one of my plates is missing :/ I remember I had 12, but somehow only 11 appeared.
This was one of those projects that requires patience. Drilling all those holes, taking measurements, trying to be precise... It took me a full day to complete it, of course, taking my time ;)
 |
| | Soup Bowls | DIY - Backsplash | Plates | |
For more Kitchen DIY Ideas check these out:
Final kitchen reveal
Updating the kitchen island
Build a range hood
Build a fridge enclosure
Closing the space above the kitchen cabinets
Install a marble backsplash
Tips about installing recessed lights
1 ½ year later How the kitchen is holding up









Aaahhh! Fantastic! Seriously Cristina,is there anything you can't do?! Love it!
ReplyDeleteIt turned out amazing, Cristina!
ReplyDeleteI love this idea, it looks amazing. Great tutorial too. Very clever. I would love for you to link up to my Inspire Me party that will be live today at 2:30 PT. www.astrollthrulife.net Hope to see you there. Hugs, Marty
ReplyDeleteWhat a brilliant idea! It looks fantastic.
ReplyDeleteIt looks fabulous! I love how it opens the kitchen up and feels so bright and airy. Wonderful tutorial as well. You did an amazing job!
ReplyDeleteI love it, it goes so well with the beautiful plate rack from last week! I suddenly feel the urge to update my kitchen...
ReplyDeleteI love it , great project
ReplyDeleteYet another brilliant project, wonderfully documented and executed. It looks fabulous, Cristina.
ReplyDeleteNot sure why I can't comment on your next post about your Halloween decor, but anyway, I loved it all and Thanks Tons for linking to Inspire Me. Hugs, Marty
ReplyDeleteI love that you did this! Every time I walk by those round dowels in at Home Depot I think about building a plate rack. It looks great!
ReplyDeleteSuch a brilliant idea! I love this! I love that its open and it looks so organized and clean. I would imagine it took a lot of patience! You are so good at all the handy stuff. I would love to have the gift of being this handy combined with my passion for design. Great project!
ReplyDeleteLaura
What a great idea. YOU are amazing. Talented and so hands on. Way to go, girl! You can come help me anytime! xo Diana
ReplyDeleteQue buena esa idea de colocar los platos parados ,, tus post muy didáctico,,,como siempre
ReplyDeleteAnother neat project. I like how you mathematically planned it all out, this gave you such a precise rack that it looks like it came with the cupboard.
ReplyDeleteWow That looks great!! I have to say you have a gorgeous kitchen Cristina. And opening up that cabinet has made it even more so!
ReplyDeleteThanks Shey Sands! Yes, that's a Waverly fabric -Pom Pom Play Spa- a post about the treatment is coming up on Thursday. See you then ;)
ReplyDeleteThis is just amazing!! It looks fantastic! I love it! It does look great open and your plates look so pretty!
ReplyDeleteLove it! And thanks for the great tutorial!
ReplyDeleteLeslie
House on the Way
Super crafty work! It looks great...adds that something special to the room! :)
ReplyDeleteLooks great and your tutorial made it look so easy to build! Thanks for sharing.
ReplyDeleteSandy
I stopped over from the Monday Funday Link Party. I have Pinned this I really want to make my husband make this for me, thank you so much for sharing.
ReplyDeleteIt looks amazing! I love it. I'm now trying to decide if I have a place for one of those in my tiny kitchen.
ReplyDeleteBonnie @ OurSecondhandHouse.com
Love Love Love! Come share at my new monthly linky party -- Organization Ideas AND Room Reveals -- it just opened! XO, Aimee
ReplyDeletehttp://www.itsoverflowing.com/2013/11/home-organization-ideas/
Hi Cristina!
ReplyDeleteWow, here is another gorgeous Project you make it look so easy, but that's caz you're one talented gal! Que habilidad de mujer, por dios! Wish I lived by you, I'd be at your house everyday asking you the 'how to's!!! ' Your kitchen looks fabulous with this new wrack!
Big hugs,
FABBY
LOVE the plate rack! It may have taken a whole day, but it turned out great - so worth it. I've already pinned this for future reference.
ReplyDeleteIf you're interested I would love if you shared this at Gingerly Made's Show & Tell party going on right now. http://www.gingerlymade.com/2013/11/show-tell-51.html
This idea is great. It looks beautiful!
ReplyDeleteThis is great. Thanks for the tutorial. It looks so much harder than it is. Great job.
ReplyDeleteLove it!!! I'd love it if you'd add it to our link party @ http://thecraftiestallie.blogspot.com/2013/11/its-that-time-again-friday-follow-along.html
ReplyDeleteThat looks amazing, just adds to your beautiful kitchen
ReplyDeleteYou are so clever...and patient! This looks fantastic!!
ReplyDeleteVERY pretty! Well done!
ReplyDeleteLooks great! Job well done! Would love to invite you to come by and share it at One More Time Events...http://www.onemoretimeevents.com/2013/11/dessert-display-with-flour-sack.html Tammy
ReplyDeleteYou've been featured today. Thanks for linking up to Gingerly Made's Show & Tell party! http://www.gingerlymade.com/2013/11/show-tell-features_12.html
ReplyDeleteI couldn't do that if my life depended on it
ReplyDeleteOH MY...I'm totally not a DIYer...but you've inspired me. I need to do this! Love it! Would love to see you link this up over The Weekly Creative - 6 blogs, a ton of fun!
ReplyDeletehttp://www.reasonstoskipthehousework.com/the-weekly-creative-33/
Wow! It looks terrific, Cristina! Isn't it hard to believe all the time it takes for that amount of detail? But...it's so worth it. I love the new look. And...isn't there always one more thing that you just maybe could do?
ReplyDeleteWishing you an Extraordinary weekend!!
Thanks! I'm planning on remodeling my kitchen this spring.
ReplyDeleteWhat a great project! I'm hoping to get started on kitchen makeover soon - Pinned!
ReplyDeleteCool! And you wrote such a great and detailed tutorial!
ReplyDeleteSO Pretty! You are my next week's party favorite project… LOVE THIS!
ReplyDeleteI don't know how I missed this. I've been looking for a tutorial on doing this very thing - thanks Cristina!
ReplyDeleteThank you so much for this! Just FYI Ikea sells little white plugs if you want to hide the extra shelf holes they are a $1.00 . It's a steal
ReplyDeleteThank you so much Cerax22! I got to look for those on my next trip to Ikea, I didn't even know such product existed!
ReplyDeleteI'm looking at doing something similar, and this is super helpful! Thank you for posting it.
ReplyDeleteI'm also really excited to read a renovation project blog written by a woman who is actually doing her own cutting/constructing/etc.! Most blogs are like, "I made the design for this awesome thing and then had my husband build it." Which is fine but it's also nice to see women who have determined that they are more than capable of sawing and screwing things together themselves! I am also the main power tool user in my house. :)
Thanks Ilyeana! I wish I could ask my husband to build something for me. I tried but nothing was done, so I have to do it myself. You're so right, we're all capable of doing this kind of work by ourselves!
ReplyDeleteLove this idea! Your kitchen is beautiful, could you tell me where you got your roman shades?
ReplyDeleteThanks!
I love your design! I just bought an old open hutch top tgat is too g in my kitchen and I'm going to try this. Could you tell me how you clean it? I know it's been years since you posted it. Hopefully you still check this post. Thanks!!!
ReplyDeleteHi there! Yes, it's been years since I posted this, and guess what? I'm still using this plate rack! I have to disassemble the entire plate rack every time I have to clean the bottom of the cabinet. In reality, is only unscrewing 8 screws, cleaning it, and assembling it again. It's easy, but somehow I never want to do it.😛 That must be the only drawback of this entire project.
Delete