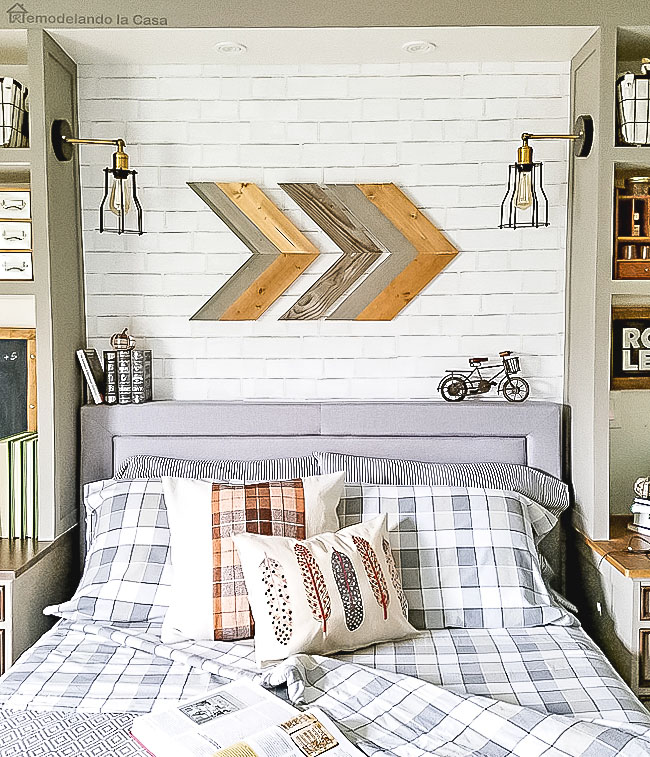
One of the best ways to use up your wooden pieces from the scrap pile is to turn them into art! Yep. The possibilities are endless, but this time I went for a rustic wooden arrow or chevron to decorate my son's room.
Thanks so much for your kind comments to my previous post, the tour of the bedrooms in my home.
As promised, here are the details about the arrow wall art in my son's room.

Let's start with the fact that this project was totally inspired by a similar project this talented blogger HERE created for her little boy's room.
*This post contains affiliate links.
I collected random pieces of wood -mainly 1 x 4's- I had in the garage. They were cut at 45° angle and 12" length, but unlike my inspiration, I used the Kreg jig to put together the pieces.
If you don't own a Kreg Jig, well, you should get one! That's how much I love it. It creates strong joints by drilling holes at an angle into one of your wood pieces, and then you join it to the second piece of wood with self-tapping screws.
If you don't have a Kreg Jig or don't want to buy one, go check how my inspiration HERE did it.
I used three types of wood, one old board with a natural weathered look, other pieces that were stained, and also some remnants of the barn wood grey shiplap planks I used to cover my wheelbarrow here.
Three pieces were created, and since I didn't want to have much trouble hanging those three pieces on the wall...

I decided to attach some clear acrylic pieces to put together the whole thing. I cut the acrylic sheet with my BladeRunner saw, and did pre-drills before driving the screws.
This is how the the back of the entire thing looked after adding a pair of sawthooths.

As you can see, the clear acrylic is hardly noticeable, and it was surely easier to hang as only one piece.
Here, the view of the entire room.
It's an easy project done with pieces from the scrap pile and the room owner loves it! It doesn't get better than that. ;)
For more DIY Home decor check these out:
 |
| | Kreg Jig | |
I collected random pieces of wood -mainly 1 x 4's- I had in the garage. They were cut at 45° angle and 12" length, but unlike my inspiration, I used the Kreg jig to put together the pieces.
 |
| | Ryobi Drill | |
If you don't own a Kreg Jig, well, you should get one! That's how much I love it. It creates strong joints by drilling holes at an angle into one of your wood pieces, and then you join it to the second piece of wood with self-tapping screws.
If you don't have a Kreg Jig or don't want to buy one, go check how my inspiration HERE did it.
Three pieces were created, and since I didn't want to have much trouble hanging those three pieces on the wall...

This is how the the back of the entire thing looked after adding a pair of sawthooths.

 |
| Teen Boy Room Makeover | Bed | Build-ins | Lighting |
It's an easy project done with pieces from the scrap pile and the room owner loves it! It doesn't get better than that. ;)
For more DIY Home decor check these out:
*This post has affiliate links for your convenience.*


Cristina, this is a wonderful creation! So glad he likes them. :) I love that you used the clear acrylic on the back to hang them as one piece... brilliant! :) Love the wood and ... I have to get a Kreg jig.
ReplyDelete~ Christina in FL
What an awesome boys room! The arrow is super cool!
ReplyDeleteyour son's room is super cool, I think I love every single detail, from the built-in to the brick wall, to the light and now the arrow. Great inspiration and beautiful pics!
ReplyDeleteLove your arrow thanks for the how too
ReplyDeleteI love how this turned out and once again - I love that whole room!
ReplyDeleteShelley
Love this project! Inspired me for my boys room!! Gorgeous job!
ReplyDeleteThis is a great project and I love your son's room. Amazing job, Cristina
ReplyDeleteI love this look. I may have to steal it!!
ReplyDeleteLove on so many levels!
ReplyDelete