Hello there!
My son's bedroom has been in a full makeover mode. The first part that I had to tackle was the closet, and right now it is time to remove that awful carpet and install some pretty awesome plywood planks!
You can check the previous post about installing the sliding door for the closet right HERE.
The floor didn't look good at that moment, I know. The carpet had been removed and I painted the sub-floor, getting it ready for the new flooring.
The room used to have carpet as you can see in the picture below (A before pic of the closet). It didn't look bad in this pic, but believe me, after 15 years of use it needed to go.
My main choice for the carpet replacement was hardwood floors. For about a year I kept on tracking the prices for 3/4" - 4-5" planks, the lowest it went was $3.10/sq-ft. Not a bad price but when adding other supplies + tools and having in mind that I wanted to replace the carpet in the entire second level of our home, the total cost would have been around $3,200. Still not a bad price for an area of about 900 sq ft.
However, I went the DIY route because of savings. Having a girl in college and another kid quickly approaching the same route, I have to save money the most I can. And since this is the second level of our home, which is not used as much as the first level, I thought using a lower level material here wouldn't be that bad.
I followed this tutorial from Addicted2Projects. You should check and read all the valuable info they give if you really want to give the Wide plank Plywood Flooring a try.
This is my experience:
The material: Rough sheets of pine plywood I bought at Home Depot for around $23/sheet. For this room, which is the guinea pig for this project I bought 5 sheets. The good people at HD ripped each of the plywood sheets in 8" planks for free.
From each plywood sheet, I got 5 planks that were exactly 8" wide, the last plank was about 7½" due to the amount of material the blade eats.
This material is rough, it has markings. When I was looking at this stuff there in the store I was a bit hesitant because it has lots of knots, rips and overall it didn't look nice. But having in mind my inspiration, I went ahead and bought it. Besides I'm going for a rustic-industrial look in this room. ;)
Once at home the first task was to give all the planks a good sanding. I used 100 grid sandpaper to smooth out the top part and sides of each plank. The marks disappear after some sanding.
The next step is to choose your stain. Those two boards in the above picture were sample boards. The one on the left was at 25% and the other at 50% strength. The stain I chose was Varathane wood Stain - Ash.
My family chose a very dark color - The full strength of the Ash stain. I was trying to convince them to go towards a "white-ish" flooring but nope, they kept on asking for a dark stain.
The stain was applied with those stain pads you can also find at Home Depot.
Once the stain dries, you need to sand all the planks. I used 120-grid sandpaper for this.
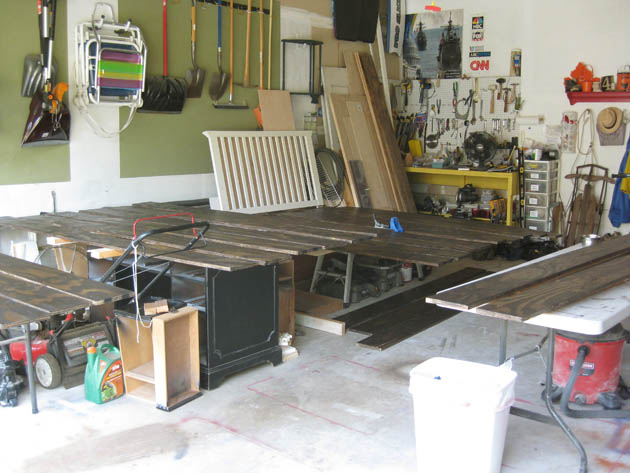
This is how my garage looked when in the middle of it all. I worked on the table on the right-hand side and kept on moving the planks.
For this first coat, I used foam pad/brushes like the one you see in this picture, but that was a bad idea.
When the poly is applied it looks blue-ish, after it dries is clear. The planks felt a bit rough as you can see in the picture below. It could've been from applying the be poly with the foam, I also spotted little bits of the sponge here and there.
Again, light sanding is needed.
For the 2nd and 3rd coats of poly, I used a Purdy brush, and ahhh, what a difference! It went really fast. After the second coat, I hand sand a couple of boards where I felt a bump or two.
The poly was applied on the top of each plank and on all of their sides.
This is how they looked once finished.
Here is the whole pile, ready to be installed.
At this point, they felt very smooth. One more coat of poly is going to be applied after installation, which will be one of my next posts.
My overall view so far:
It looks like a lot of work and it is. However, it's not harsh harsh work.
For me, the hardest part was the sanding and not because the planks needed lots of sanding. It was hard on my hand because of the weight of the sander. Even though I took my time, my right hand was in pain. (though my hand has been hurting since building the closet where I used some clamps that were very hard to open and close!).
I liked that I was able to work on this project while standing up, with no back or knee pain which is what you get when the floor is already installed.
It takes time, I allowed the coats of poly to dry for at least 24 hours before applying a new coat.
This is a small room - From the 30 planks, I got from the 5 sheets of plywood I only finished 26 because I thought 4 of them look too bad, two of those were the ones I used to try the stain.
Well, that's all I can think of it so far.
For all the info about How to Install the Plywood Planks click HERE.
;)
The following are all the links to each of the projects done in this room:


I've never seen this done before. What a cool idea. I'm looking forward to see how it turns out. What are you planning to do to transition between this floor and the next? - John
ReplyDeleteThanks John! This project is somewhat popular among DIY'ers. My plan, depending on how much I like it here in this room, is to install the same planks in all my second floor (That'll be sometime next year). The first picture in this post is a sneak peek of the room with the floor in place, I have no idea what to use as a temporarily transition between the planks and the carpet. I don't want nails driven into the planks. I need a trip to the home center to check the options they have.
DeleteThe wood looks gorgeous. I'm eager to see it in the room.
ReplyDeleteThanks Megan! I just didn't have the time to go thru all the pics I took to edit and upload them, and besides this post was getting a bit too long. The planks are already installed and I really like them. Only time will tell if it all was worth it.
DeleteThe wood looks gorgeous. I'm eager to see it in the room.
ReplyDeleteWow- That IS a lot of work, Cristina, but WHAT a savings!!! It is going to be beautiful once it's in place and you will be so proud of yourself. Great job, kiddo! xo Diana
ReplyDeleteThanks Diana! Now I just have to count the savings. ;)
DeleteI'm so glad this is DONE! Though, I'm planning on doing it again if it holds well.
I love how they look!
Wow! I can't believe how much time you put into this! Can't wait to see the finished project!
ReplyDeleteSheila @ Making the Most of Every Day
A big job! I love it and will keep in mind for my bedrooms. Sympathizing with the hand and body aches!
ReplyDeleteLooking good, can't wait to see how it turns out!
ReplyDeleteOMG, now your making your own floor?! Next time you'll be building an addition to your house! Is there anything you can't do Cristina?! You are amazing!
ReplyDeleteWow, Cristina, just wow. I am so curious to see how you like this over time. You are one trail-blazing DIY mama, and the sneak peak looks pretty amazing.
ReplyDeleteThis is going to be amazing Cristina!! You are certainly still queen "Norm"!! I can hardly wait for part two!!
ReplyDeleteInstead of hand sanding, could you just rent a commercial floor sander after the boards are installed then stain?
ReplyDeleteThat's a really good option, if it doesn't require me working there close to the floor.
DeleteI'd like to offer a few suggestions: You made that job a LOT more time-consuming by not just staining the floor after it was installed, and never in my life have I heard of someone sanding wood after staining, so that step can go away as well. Also, no need to sand between poly coats if you coat it twice within 24 hours, which is no problem with water-based poly. Also, sandpaper has a "grit," not a "grid." The amount of grit reflects how rough it is. Last bit of advice, if you use spar varnish (available at any home improvement store), it will wear longer, and is waterproof (they use it on boats). If you apply the spar varnish after the planks are installed, you'll actually be waterproofing the cracks between as well, which makes for great peace of mind!
ReplyDelete