Ha that has to wait a bit, we usually take a break in August, when Mr. RLC is on vacation from work.
In the mean time I have to make believe we're living on the waterfront. :)
And the project today is a good example of it.
As most of my projects, this one began with some leftovers from previous projects.
I had these remnants of ¼" plywood that I used on the bookcases in my bedroom.
Using a round placemat I already had, the round shape (15" dia.), was transferred onto the wood. The four pieces of wood were bundled up with tape before cutting out the design with my BladeRunner, you can also use a jigsaw.
Next, you have to sand, sand and SAND those edges very well before painting or like in my case, stain them. I applied one coat of Rust-Oleum Wood Stain - Driftwood, the same I used on my kitchen table. As soon as I finished applying the stain, it was wiped off with a dry rag. The right picture below shows the difference between the natural and stained placemats.
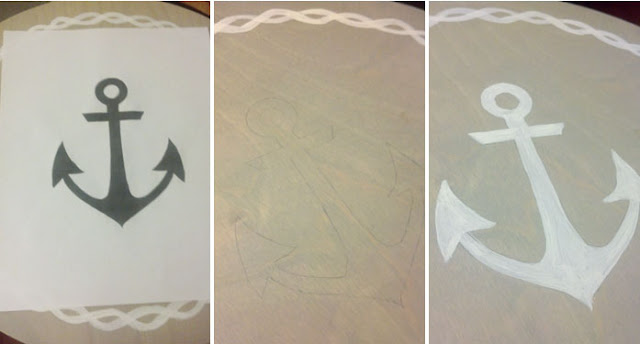
Once the stain was dry, the fun part began. I wanted to give them a nautical feel, and thought about giving them a rope border but alas, those were hard to paint. Finally I found this rope border circle clip art, blew it to the size of my placemats and traced two simple lines as shown below.
Then, using a small flat brush I followed those lines with white acrylic paint. It was easy to follow the lines.
The same thing was done in the center, what better than an anchor as a coastal decor.
You don't need to stay perfectly within the lines while painting, if you get a little mistake just distress it. ;)
This is how they looked at the end of the day. The final step is to give them a clear coat of poly.
Having the placemats ready I searched my home for anything Summer or coastal decor I could use on my table...
Shells, my daughter's handmade little bowl set, the thrifty Royal Staffordshire set, and many bottles...

Yeah, they all completed my table!
More about this table, my home and lots more of coastal decor is coming on the
2015 Summer Home Tours
beginning June 8
I'm so excited about it!
5 days - 30 homes
Tons of inspiration!


Absolutely beautiful Cristina!
ReplyDeleteYour talented and creativity knows no bounds. Absolutely beautiful, Cris!!!!
ReplyDeleteHow pretty! It is a fabulous idea. Have a great weekend. xxx Maria
ReplyDeleteVery clever, love the idea of a wood placemat!
ReplyDeleteJenna
What a great idea. Love how they turned out.
ReplyDeleteWhat a great idea. Love how they turned out.
ReplyDeleteWhat a great idea. Love how they turned out.
ReplyDeleteHola Ceistina !! Que bonito te quedaron esos individualue !! Me gusta mucho el look coastal
ReplyDeleteWhat a fun project!
ReplyDeleteI love this look for a summer tablescape!
ReplyDeletexoxo, SS
The Southern Stylista