I wanted the fireplace to be the focal point in my family room.
I was also going to have a big t.v. in this room, but I didn't want the t.v. to take center stage.
The main goal in this room was to give the fireplace visual interest and height, balancing the whole space (kitchen and family room), on one side of this big room is the range hood and on the other side the fireplace.
 |
| These are the parts of a fireplace |
This is how it looked before:
 |
| Nothing up there, I just had that ugly picture! |
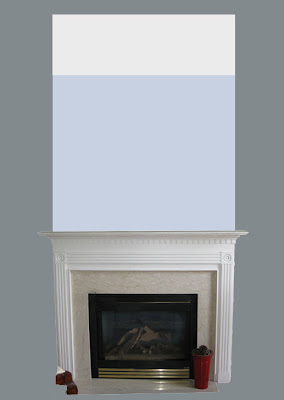
The following pictures show an easy way to create the over-mantel:
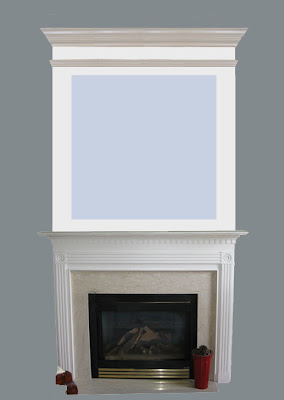
-Finally, a much smaller piece of molding ½” was attached all around the center to cover the rough edges of the MDF, as shown:
I cleaned the firebox, scraping the inside walls to get rid of rust. Two coats of spray paint Rust-Oleum High Heat were applied to the inside as well as the outside of this firebox (I was happy to cover that brass color on the bottom panel). Protect or cover all the other contiguous areas from getting this black paint!
-The whole structure was built out of ½” MDF. A big piece of MDF was attached to the wall (nailed to the studs). The dimensions for this piece are taken according to what you have. The width should be the same as in the lower portion of the fireplace and the height would be the distance from the top of the mantel shelf all the way to the ceiling.
-Right on top of this piece I attached another one like this:
-Two more pieces were attached on each side, the width of these pieces should be the same as the legs of the fireplace.
-One more at the bottom:
-Next, the crown molding at the top (definitely, practice makes perfect. This time, my third time dealing with this molding, it was a cinch to install it). If you have trouble with the crown corners click HERE to see how to do it.
-A narrow strip of molding (base cap) was attached below the crown.
This base cap molding was installed all around the room. The piece of wall in between this molding and the crown molding is painted the same color to give the illusion of a built up or upgraded crown.
-Finally, a much smaller piece of molding ½” was attached all around the center to cover the rough edges of the MDF, as shown:
To finish it up, all the gaps and holes were filled with caulking, then sanded and painted, following the steps taken for painting the kitchen cabinets.
 |
| Hubby show up at the end just to take pics! |
 |
| Rust-Oleum High Heat Spray Paint |
This is how it looks with the overmantel:
I just installed crown molding at the top of the overmantel. I didn't install it around the room because of my budget. That’s something I have to do later on.
You can see how it looks all dressed up during the family room tour here:
Or here, for Spring:
REMEMBER TO PIN IT!
You can see how it looks all dressed up during the family room tour here:
Or here, for Spring:
*This post contains affiliate links.*


Wow! Love it, you did an excellent job of it. Following you. Diane
ReplyDeleteJust saw you over at Uncommon slice of suburbia! Love your style and I'm now following you:)
ReplyDeleteBeautifully done! I'm here via Uncommon Slice of Suburbia's post and am thrilled to find your blog.
ReplyDeleteTake care,
Pam
What a great idea and it is so pretty. Love all the detail you are adding to the room. I am here from Slice of Suburbia, and your newest follower. Welcome to blogland. Hugs, Marty
ReplyDeleteChristina Bravo!! I found you at Kristin's and wanted to welcome you to Blog World!
ReplyDeleteYou are so talented and what a huge difference you have made with your mantle!
Psst I have a Valentines Giveaway I think you will love!!
xoxo
Karena
Art by Karena
Thank you sooo much to all of you! I'm very happy to share my projects with you! but most importantly to have found this wonderful world I didn't even know existed!
ReplyDeleteHey there! Found you at Uncommon Slice...
ReplyDeleteWhat great style you have. Gorgeous kitchen!! Magazine worthy for sure!
New follower, I hope you'll come check out the Farmhouse Porch.
♥Linsey
This is so gorgeous! I really want to do something similar to my fireplace and seeing this was very inspiring and encouraging. :-) Thank you so much for sharing it with us at Inspiration Friday!
ReplyDeleteVanessa
P.S. LOVE your kitchen!!
Hi- Just found you through Kristin at Slice of Suburbia and wanted to visit your blog. I am your newest follower. I love all your energy and what you are doing to your home. I'll be here to watch what you are up to next. GREAT job on your kitchen AND on your mantle! Love it all! Hugs- Diana
ReplyDeleteps. Just a short ps to you. I notice that you are replying to some of the comments in your comment section. I usually do it through my email (cuz my comments are set up that way) because what happens is that once people comment on your post they don't usually come back to read your reply. I didn't learn that until I had been blogging almost a year. I wish you the best of luck with this! You will love all your followers in a very short time.
Just seeing if your word verfication is off...xo Diana
ReplyDeleteYep- Good job, kiddo. Welcome to Bloggers Bugs...where every little thing can be a problem!;>) xo Diana
ReplyDelete;)
ReplyDeleteThis is beautiful, Cristina! Makes me wish I had a fireplace too.
ReplyDeleteAWESOME! Featuring you today! XO, Aimee
ReplyDeleteLOVE what you did to your fireplace - have the same kind. You are such a great decorator, and designer! keep up the great job!!!
ReplyDeleteGeneva
I just found your site and I just love what you did to your fireplace. Mine is identical and I've been wanting to do something similar as yours but could not explain it exactly to the hubby. Thanks for sharing all your wonderful ideas!
ReplyDeleteI tried sending you a picture of the electric fireplace that I built following a tutorial by Kristi at addicted2decorating.com. Please let me know if you received it. I am going to follow your tutorial and build the over mantel part. Thanks so very much for sharing your tutorial. I'm a new follower now. Thanks again.
ReplyDeleteOh my, I totally missed this. Nope, I didn't get it. :(
DeleteThanks for following along!
what type of moulding is on the wall all around the room? The base cap sits on top of this. Thanks, very pretty!!
ReplyDeleteAgain, I'm so late to answered this, many times Mr. Google sends e-mail notifications to the spam folder. :( I think you're talking about the illusion created with the white paint. There is only crown and base cap moldings, in between the two of them the wall is painted white to give the illusion of a beefed up molding.
DeleteI've been wanting to do this with my fireplace!
ReplyDeleteWhat color are the LR walls? In some images it appears grey, while in others it appears beige... we still have the cheap off-white builder paint in my LR and I'm dying to repaint but it's such a large room that I need something that's still fairly neutral.
Hi Noah, this is an easy project to tackle if you have the tools, mainly a saw and a nailer. As for the color, it's a gray color, SW - Requisite Gray. The amount of light the room receives, as usual, makes it look different during the day and night.
DeleteHello,
ReplyDeleteMy husband and I are renovating our entire house right now. Wanting to know roughly how long it took you to do this project? We have the right tools and my husband is pretty handy with home projects.
Hi Kathryn, it took me one afternoon to complete this entire project. Sanding and painting was, as usual, the tedious job that took the longest. The overmantel is very simple.
DeleteHi you said you nailed the MDF to the studs. Did you use a finish nailer 16g? Or drill pilot holes and use a hammer? Doing something very similar and see tons of conflicting things online on how to handle mdf
ReplyDeleteHi Ben, I used a 18g brad nailer. Then, I filled in the little holes. You can use plywood instead of MDF.
Delete